Oracle E-Business Suite 12.2.15 Installation on Windows
PART 6 ‐ UPGRADE TO WINDOWS 2016 SERVER, EBS 12.2.15
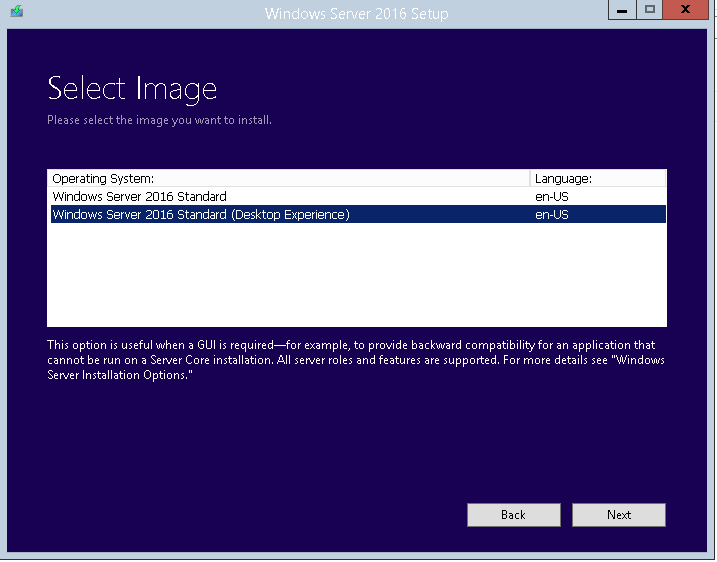
Upgrade Windows Serve 2012 server to Windows 2016 server is again very straight forward. Just mount the ISO image and run the setup from Windows GUI.
Select
Windows Server 2016 Standard (Desktop Experience)Select
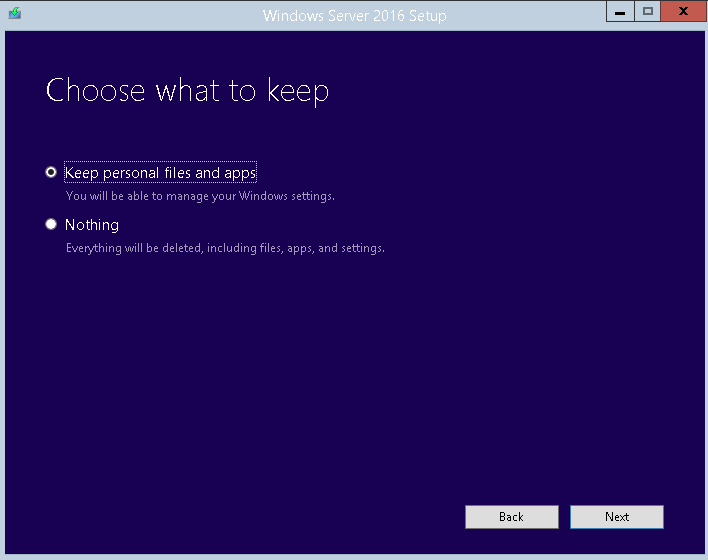
Keep personal files and apps
After the OS is successfully upgraded, relink all executables to ensure all binaries are linked properly in the new OS. Run
adadmin -> 2. Maintain Applications Files and Registry menu -> 1. Relink Applications programs. Then selectallproducts for linking.Upgrade the Java VM in database by applying DB Patch
34185253- Oracle JavaVM Component 12.1.0.2.220719 on Windowsxxxxxxxxxxset PATH=%ORACLE_HOME%\OPatch;%PATH%cd /d D:\patch\p34185253_121020_MSWIN-x86-64\34185253opatch applystart up the DB, and run
xxxxxxxxxxsqlplus /nologSQL> Connect "/as sysdba"SQL> shutdownSQL> startup upgradeSQL> quitcd %ORACLE_HOME%\OPatchSET ORACLE_SID=[SID]datapatch -verbosesqlplus /nologSQL> Connect "/as sysdba"SQL> shutdownSQL> startupOn DB Tier login as SYS and run these SQL
xxxxxxxxxxgrant execute on DBMS_METADATA_UTIL to apps;alter package APPS.AD_ZD_ADOP compile body;Patch the Weblogic server again. In patch
38073442, which contains patch37927515, unzip the filesPG6B.jarandpatch-catalog_28017.xmlto%FMW_HOME%\utils\bsu\cache_dir. Then rollback the previous patch and apply this one:xxxxxxxxxxcd %FMW_HOME%\utils\bsubsu.cmd -remove -patchlist=E7HI -prod_dir=%FMW_HOME%\wlserver_10.3 -verbosebsu.cmd -prod_dir=%FMW_HOME%\wlserver_10.3 -patchlist=PG6B -verbose -installCopy
msvcr71.dlltoC:\oracle\TST\fs1\EBSapps\10.1.2\BIN(if not done yet)Apply patch
31864846(FNDMDGEN IS CRASHING WHILE GENERATING MESSAGE FILE IN WINDOWS 2016) byadop phase=apply patches=31864846 hotpatch=yesNow you can apply patch
37182900(Oracle E-Business Suite Release 12.2.15):adop phase=apply patches=37182900 apply_mode=downtimeIf you get error about
adjavaClose the error dialog. The adop program will then exit. Close the command prompt.
From the log file, you can see which adjava commands has error.
Open a new session (with updated profile), and run these commands manually:
xxxxxxxxxxadjava -ms128m -mx256m -Xrs -Dxdo.xliff.source=EBS -nojit oracle.apps.ad.jri.UnzipFile ^C:\oracle\TST\fs1\FMW_Home\Oracle_EBS-app1\applications\oacore\html ^C:\oracle\TST\fs1\FMW_Home\Oracle_EBS-app1\applications\oacore\html\ebsuix-install.zipadjava -ms128m -mx256m -Xrs -Dxdo.xliff.source=EBS -nojit oracle.apps.ad.jri.UnzipFile ^C:\oracle\TST\fs1\FMW_Home\Oracle_EBS-app1\applications\oacore\html ^C:\oracle\TST\fs1\FMW_Home\Oracle_EBS-app1\applications\oacore\html\OracleFont.zipContinue the patching process again by
adop phase=apply patches=37182900 apply_mode=downtime restart=yes
If you encounter error of
adgrants.sqlcomplainingObject grant is missing from APPSLog on the DB as sysdba and run:
xxxxxxxxxxgrant ALL on PLSQL_PROFILER_DATA to APPS;grant ALL on PLSQL_PROFILER_DATA to APPS;grant ALL on PLSQL_PROFILER_RUNS to APPS;grant ALL on PLSQL_PROFILER_RUNNUMBER to APPS;grant ALL on PLSQL_PROFILER_UNITS to APPS;grant ALL on DBA_DATAPUMP_JOBS to APPS;grant ALL on DBA_DATAPUMP_SESSIONS to APPS;grant ALL on DBMS_DATAPUMP to APPS;grant ALL on DBMS_METADATA to APPS;On Apps session run
adcrtl-> Show worker status (see which worker is failed) -> Tell worker to restart a failed job (enter that worker #)
After it's done, run
adop phase=cleanupStartup all process, and now you can see the new
RedwoodLook and Feel:
PHASE C is completed. You can make a backup of the whole OS (VM files).
| Table of Content | Next |
| Home | Repositories | Blog |
© 2026 by Christopher Ho. All Rights Reserved